Skip to content
  • Home
  • Documentation
  • Contact
  • About
Menu
  • Home
  • Documentation
  • Contact
  • About
العربية

Designer

34
  • Introduction to the Survey Designer
  • Start As Survey Designer
  • Frequently Asked Questions (FAQ)
  • Error Messages and Their Solutions
  • Designer Dashboard
    • Overview
    • Edit Profile Information
    • Log Out
    • Change Language
    • View Key Information of Al-Khwarizmi Platform
    • View Survey Summary
  • My Surveys Screen
    • Overview
    • Viewing Surveys
    • Creating a New Survey
    • Copy a Survey from Templates
    • Duplicate an Existing Survey
    • Edit an Existing Survey
    • Delete a Survey
    • Add a Survey to Templates
    • View Survey Versions
    • Survey Reports
    • Sort the Surveys Table
    • Search the Table Data
  • Control Panel
    • Overview
    • Add organization
    • Search for a User Role
    • Creating New Groups
    • Add Users to Groups
    • Search for Users
    • Add Users
    • Assign Surveys
    • Survey Timeline View
    • Enrich the Question Bank
    • Upload a Survey Sample
    • Enrich the Coding List

Call Center

27
  • About the Call Center
  • Getting Started with the Call Center
  • Frequently Asked Questions (FAQs)
  • Error Messages and Solutions
  • Call Center Dashboard
    • Overview
    • Edit Profile Information
    • Log Out
    • Change Language
    • Sending Notifications
    • View Key Information of Al-Khwarizmi Platform
    • Viewing Available Surveys
  • Form Screen
    • Overview
    • Displaying the Survey Main Screen
    • Adding a New Job Group
    • Add Users to Survey Roles
    • Preview Users and Their Job Group
    • Add a New Queue
    • Add a New Queue
    • Assign Queues
    • Distribute Workload in Queues
    • Pull a survey Unit
    • View Task Log
    • Filter the Task Table
    • Task Table Column Settings
    • Assign Units from Queue
    • Search for a Unit
    • Add a Call

Field Managment

29
  • Introduction to Field Management
  • Getting Started as a Field Management
  • Frequently Asked Questions (FAQ)
  • Error Messages and Solutions
  • Field Managment Dashboard
    • Overview
    • Edit Personal Account Information
    • Change Password
    • Logout
    • View Al-Khwarizmi Platform Information
    • Change Language
    • View Available Surveys
    • Create New Map Update Survey
    • Preview of Geographic Maps
    • Add a New Map
  • Form Screen
    • Overview
    • Display the survey Main Screen
    • Create a New Workgroup
    • Add Users to the Survey Job Group
    • Assign Tasks Using Maps
    • Assigning Tasks Using the List
    • Assigning Units to Users
    • Viewing the Data Transfer Log
    • Configuring Data Sync Log Table Columns
    • Tracking
    • Field Researchers’ Progress
    • Table Column Settings for the Progress Report
    • Configure Survey Settings
    • Configure Survey Settings
    • Add a New Version of Geographic Layers
View Categories
  • Home
  • Docs
  • Field Managment
  • Form Screen
  • Create a New Workgroup

Create a New Workgroup

Define the workgroup required to manage the survey according to specific permissions. #

The “Groups and Users” screen allows you to set up the team members responsible for managing and carrying out the surveys. To add a workgroup, follow these steps:

  • Select “Groups and Users” from the side control menu.
  • Click the “Job Groups” tab.
  • Click the “New JOB Group” button to display a screen with the available options, then fill in the following group details:
    • “Job Group Color”
    • “Group Name in English”
    • “Group Name in Arabic”
    • “Group Description in English”
    • “Group Description in Arabic”
    • Add the roles associated with the group by clicking the “Add Role” button and configuring the following options:
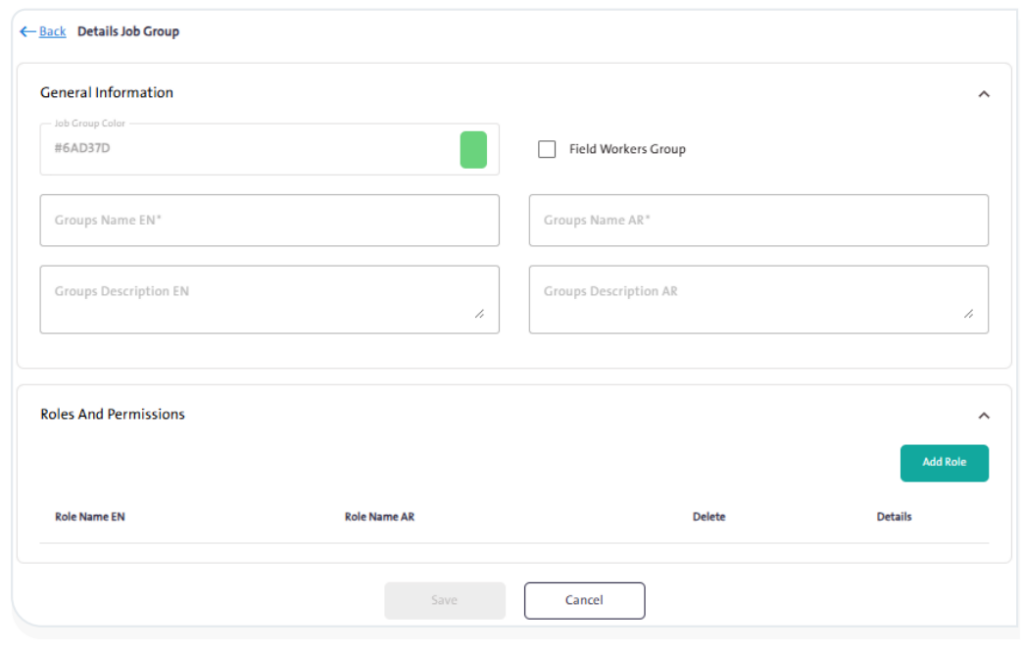
  • «Role Name in Arabic»
  • «Role Name in English»
  • Define the permissions and privileges to be granted for each role, which include the following options:

– «Settings»
– «Main Screen»
– «Groups and Users»
– «Task Assignment»
– «Data Transfer Log»
– «Tracking»
– «Progress»
– «Survey Map»

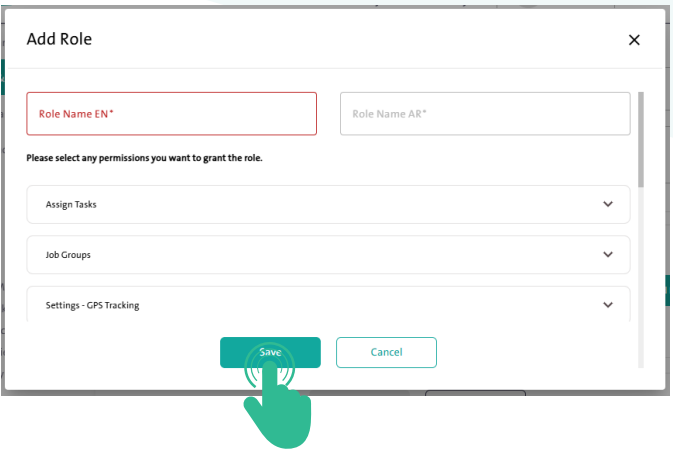
  • Once you have completed filling in the role details, click «Save».
INFO
  • You can delete the role by clicking the “Delete” icon .
  • You can edit the role details by clicking the “Details” icon .
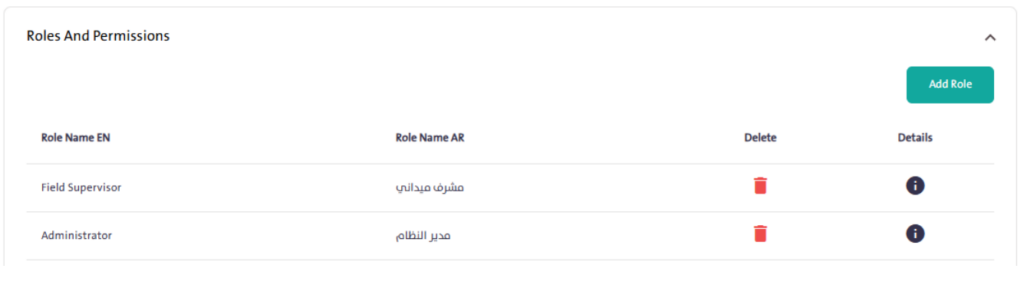
  • Once you have finished adding the roles for the group, click “Save” . The new group will then appear under the “Workgroups” tab, as shown in the figure below.
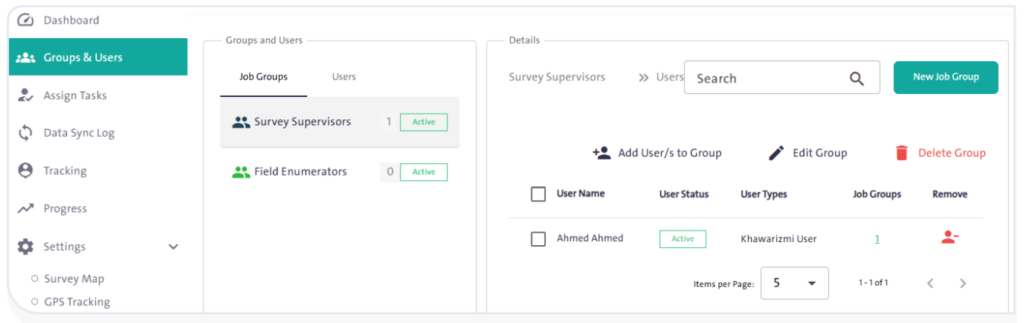
  • You can add users to the group by following these steps:

– Click “Add User/s to Group” to display the following screen:

– Click the “Add” icon next to the username to include the user in the group, as shown in the figure below.
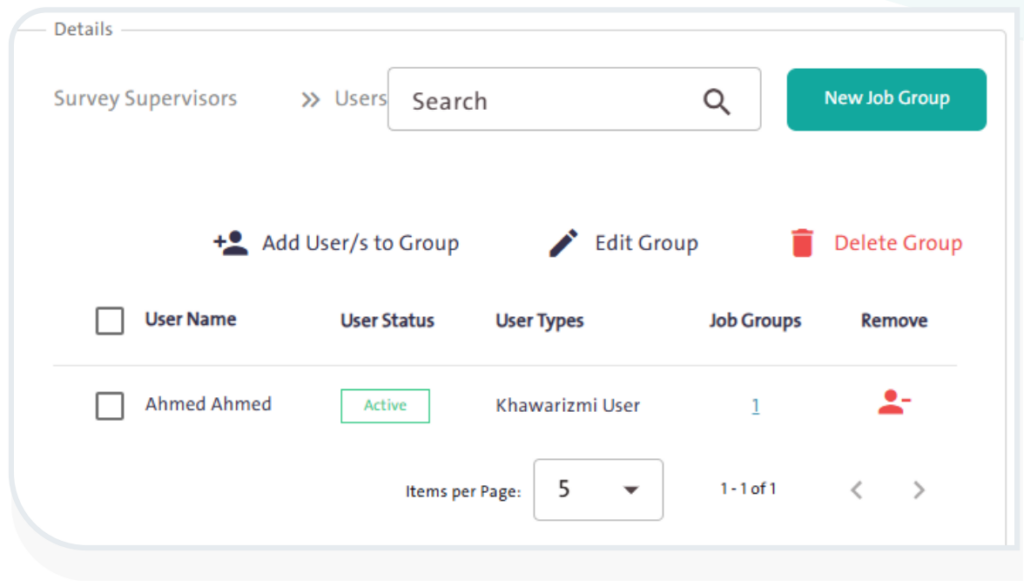
  • Click “Edit Group” to modify the group details.
  • You can delete the group by clicking the “Delete Group” icon . A warning message will appear asking you to confirm the deletion.
INFO
  • You cannot delete the group if it contains one or more users.
  • You can remove a user from the group by clicking the “Remove” icon.
  • You can search for a specific user within the group by typing the username in the search box, then clicking the “Search” icon . The result will appear on the users’ table.

What are your Feelings

  • Happy
  • Normal
  • Sad
Add Users to the Survey Job GroupDisplay the survey Main Screen
Table of Contents
  • Define the workgroup required to manage the survey according to specific permissions.

More Links

  • Abbreviations
  • Dictionary
  • Conventions
  • Al Khwarizmi Products
  • Al Khwarizmi Designer

Al Khwarizmi User Guide by Realsoft. All Rights Reserved.